
| ▲ Computer |
Important note: This technique relies on using the clipboard to transfer an image (frame) from the video stream to the picturebox. As a result, it is not possible to use the clipboard for anything else while the program is running. For a much better solution, see Webcam crosshairs using Processing.
Here, in my opinion, is the simplest method ever of getting a live webcam image into VB6 in a form which can actually be manipulated. There are various ActiveX controls around which will insert a webcam feed, but they are totally "inert" and you can't easily do things like sample pixels, draw overlays etc. Although this is based on VB6, the DLL calls could be used in other languages.
First, credit and thanks goes to Punit Ganshani (http://www.ganshani.com) for writing a very helpful PDF which explains how to do it. PDF is available from his site here, or as a mirror on mine here.
The basic principle is to use AVICAP32.DLL's capCreateCaptureWindow function to create a handle to an "object" which "receives" the live webcam feed. (I'm not au fait with programming jargon, so that's my interpretation of it.) You control this "object" (e.g., connect, disconnect, set frame rate, capture frame etc) by sending Windows messages to the handle by using the SendMessageA function in the USER32.DLL library. Of most use is the ability to capture a single frame to the clipboard, which can then be pasted into a picturebox control. After that, you can then process and analyse the image by using any of the normal picturebox commands.
Read Punit's description first to get an idea of how the process works. I've written a simple VB6 program, available in a ZIP file here, which implements the method and demonstrates various things you can analyse from the image. Connect your camera, run the program, and click Connect first to connect to the camera. Hopefully a live image will appear in the display. Although it appears live, it's actually a series of captured frames, copied and pasted from the clipboard into a picturebox at a rate of 50Hz using a timer control. Check out the Timer1_Timer() code - this is where most of the interesting stuff happens. I put the function declarations and the definitions of the various message constants into Module1.bas for convenience. It's quite difficult to find out what the actual message constant values are - these were pieced together from various sources on the web, and should be sufficient for most applications.
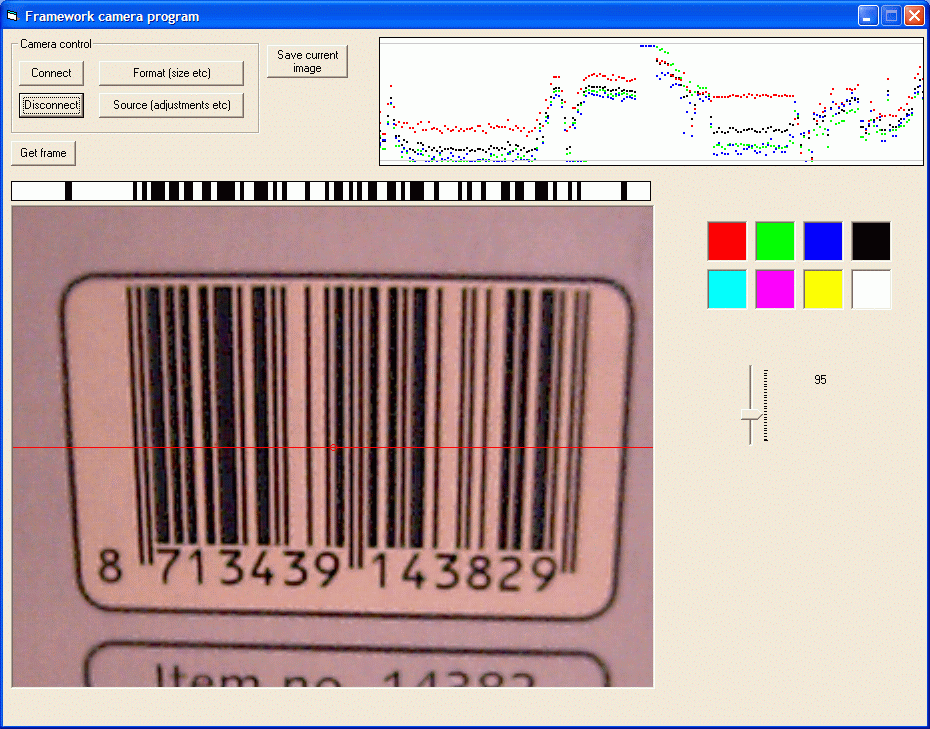
Screenshot shown below. The graphs in the top right show the historical R,G,B and average values of the pixel at the center of the frame. Just above the capture window (and below the "Get frame" button) there is a bar which shows a B&W scan across the frame, along the red line. The threshold level is set by the slider on the right. You can see how it correctly reproduces the barcode. The coloured squares are just something to point the camera at and see how the RGB values change.
This has endless possibilities - have fun! Microsoft do have a legacy video capture reference at http://msdn.microsoft.com/en-us/library/windows/desktop/dd757677%28v=vs.85%29.aspx, but it's a bit hard to follow.
| ▲ Computer |