Partitions - detailed look at each one
Jump to section:
- Introduction - dumping partitions
- File and partition sizes
- References
- Mounting an image
- /dev/block/nanda - bootloader
- /dev/block/nandb - env
- /dev/block/nandc - boot
- /dev/block/nandd - system
- /dev/block/nande - data
- /dev/block/nandf - misc
- /dev/block/nandg - recovery
- /dev/block/nandh - cache
- /dev/block/nandi - emmc (a.k.a. databk)
- /dev/block/nandj - sdcard
Introduction - dumping partitions
This is all done on Mum's tablet, which has the original firmware on it. I had been using it for a while, so there will be additional applications and data present. First, let's dump each partition from the device on to an SD card. Insert a blank SD card (at least 4GB - this will take up a lot of space), boot up into Android, connect to the computer, then run the following ADB commands:
adb kill-server
adb devices
adb shell "cat /dev/block/nanda > /mnt/extsd/nanda.img"
adb shell "cat /dev/block/nandb > /mnt/extsd/nandb.img"
adb shell "cat /dev/block/nandc > /mnt/extsd/nandc.img"
adb shell "cat /dev/block/nandd > /mnt/extsd/nandd.img"
adb shell "cat /dev/block/nande > /mnt/extsd/nande.img"
adb shell "cat /dev/block/nandf > /mnt/extsd/nandf.img"
adb shell "cat /dev/block/nandg > /mnt/extsd/nandg.img"
adb shell "cat /dev/block/nandh > /mnt/extsd/nandh.img"
adb shell "cat /dev/block/nandi > /mnt/extsd/nandi.img"
adb shell "cat /dev/block/nandj > /mnt/extsd/nandj.img"
(These commands could be put into a batch file.) After 5-10min, you should now have image files corresponding to each of the 10 partitions. Transfer these over to a USB stick - more useful later.
File and partition sizes
Here's the contents of /proc/partitions on the tablet. The sizes are in blocks, where on block = 1024 bytes.
major minor  #blocks  name

  93        0      16384 nanda
  93        8      16384 nandb
  93       16      32768 nandc
  93       24     524288 nandd
  93       32    1048576 nande
  93       40      16384 nandf
  93       48      32768 nandg
  93       56     262144 nandh
  93       64     131072 nandi
  93       72    1809408 nandj
Next, here's the sizes (in bytes) of each of the image files, obtained using ls -l on Linux:
lindsay@lindsay-Vostro1310:~$ ls -l
total 3983540224
-rw-r--r-- 1 lindsay lindsay   16777216 Jan  4 12:43 nanda.img
-rw-r--r-- 1 lindsay lindsay   16777216 Jan  4 12:43 nandb.img
-rw-r--r-- 1 lindsay lindsay   33554432 Jan  4 12:43 nandc.img
-rw-r--r-- 1 lindsay lindsay  536870912 Jan  4 12:46 nandd.img
-rw-r--r-- 1 lindsay lindsay 1073741824 Jan  4 12:50 nande.img
-rw-r--r-- 1 lindsay lindsay   16777216 Jan  4 12:50 nandf.img
-rw-r--r-- 1 lindsay lindsay   33554432 Jan  4 12:50 nandg.img
-rw-r--r-- 1 lindsay lindsay  268435456 Jan  4 12:51 nandh.img
-rw-r--r-- 1 lindsay lindsay  134217728 Jan  4 12:52 nandi.img
-rw-r--r-- 1 lindsay lindsay 1852833792 Jan  4 12:58 nandj.img
In order to compare this with the partition sizes, we need to display the file sizes in blocks as well. This can be done using the --block-size=1024 switch:
lindsay@lindsay-Vostro1310:~$ ls -l --block-size=1024
total 3890192
-rw-r--r-- 1 lindsay lindsay   16384 Jan  4 12:43 nanda.img
-rw-r--r-- 1 lindsay lindsay   16384 Jan  4 12:43 nandb.img
-rw-r--r-- 1 lindsay lindsay   32768 Jan  4 12:43 nandc.img
-rw-r--r-- 1 lindsay lindsay  524288 Jan  4 12:46 nandd.img
-rw-r--r-- 1 lindsay lindsay 1048576 Jan  4 12:50 nande.img
-rw-r--r-- 1 lindsay lindsay   16384 Jan  4 12:50 nandf.img
-rw-r--r-- 1 lindsay lindsay   32768 Jan  4 12:50 nandg.img
-rw-r--r-- 1 lindsay lindsay  262144 Jan  4 12:51 nandh.img
-rw-r--r-- 1 lindsay lindsay  131072 Jan  4 12:52 nandi.img
-rw-r--r-- 1 lindsay lindsay 1809408 Jan  4 12:58 nandj.img
Comparing these with the partition sizes from /proc/partitions, we can see that they are exactly the same, as expected.
References
Here's some good references on partitions:
- http://androidforums.com/evo-4g-all-things-root/278898-android-partitions-kernels-explained.html
- http://androidforums.com/evo-4g-all-things-root/279261-more-information-about-android-partitions.html
- http://www.addictivetips.com/mobile/android-partitions-explained-boot-system-recovery-data-cache-misc/
Mounting an image as a filesystem under Linux
Some of the partition images are filesystems which can be directly mounted under Linux. This takes a wee bit of trickery. As an example, we'll use the nanda.img image file. All this is done under Ubuntu 12.04.
First, copy the image file to the Linux machine - I put it on the desktop (i.e. under /home/lindsay/Desktop).
Next, make a new directory on the desktop - for example, nanda. This will be the mount point for the image file.
To enable read/write permissions on the mounted image, we need to know the user id (UID) and group id (GID) of the current user. This is done using the id command:
lindsay@lindsay-Vostro1310:~$ id
uid=1000(lindsay) gid=1000(lindsay) groups=1000(lindsay),4(adm),24(cdrom),27(sudo),30(dip),46(plugdev),109(lpadmin),124(sambashare)
So, the UID is 1000, and the GID is 1000.
We're now ready to mount the device. Run the following command (see here):
sudo mount -o loop,uid=1000,gid=1000 -t vfat nanda.img nanda
This mounts the nanda.img file, with the directory nanda as the mount point. The -t switch specified a vfat filesystem, and the -o specifies the UID and GID options (so you can read & write to the filesystem). Browse the nanda folder - you'll see the whole filesystem and can add or remove files as required.
Once finished, unmount the image with the following:
sudo umount nanda
The nanda.img image file, although remaining the same size, will contain the updated filesystem.
Let's take a look at the partitions.
/dev/block/nanda - bootloader
This is the very first partition which the processor looks at on startup. Mount using
sudo mount -o loop,uid=1000,gid=1000 -t vfat nanda.img nanda
Here's the contents of the image:
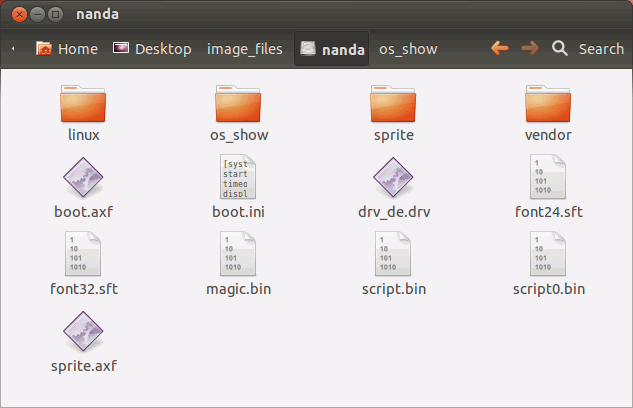
Some interesting stuff. script.bin is the configuration file used by the A13 processor when first starting (see here, although that's for an A10). boot.axf appears to be Allwinner's own bootloader, which can then load u-boot (contained inside the linux directory).
Click here for a tree listing of all files and directories in the image (obtained using the sudo tree -F command).
Here's the contents of the linux directory:
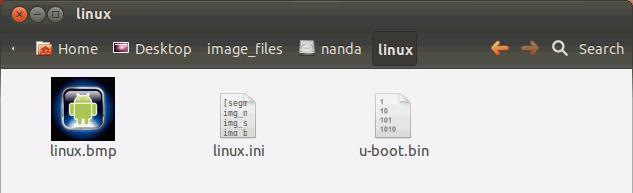
And the contents of linux.ini:
[segment]
img_name = c:\linux\u-boot.bin
img_size = 0x80000
img_base = 0x4A000000

[script_info]
script_base = 0x43000000
script_size = 0x10000

[logo_info]
logo_name = c:\linux\linux.bmp
logo_show = 1
This says to use the u-boot bootloader. To change the small square logo shown first on startup, just replace the linux.bmp image with another of the same kind (32-bit colour).
The os_show directory contains various images used by the bootloader, mainly battery charging symbols.
/dev/block/nandb - env
This partition is a bit of a mystery. Very little information is available on it.
It appears to be related to the u-boot bootloader (which is located on /dev/block/nanda). According to here, it is the environment to assist u-boot.
Some more information is available here:
Many embedded devices these days use the U-Boot bootloader. This bootloader stores its configuration into an area of the flash called the environment that can be manipulated from within U-Boot using the printenv, setenv and saveenv commands, or from Linux using the fw_printenv and fw_setenv userspace utilities provided with the U-Boot source code. This environment is typically stored in a specific flash location, defined in the board configuration header in U-Boot. The environment is basically stored as a sequence of null-terminated strings, with a little header containing a checksum at the beginning.
And more, from here:
Many embedded devices these days use the U-Boot bootloader. This bootloader stores its configuration into an area of the flash called the environment......
Yet another hint is in the COMMON_SYS_CONFIG000000.fex file which can be unpacked from the stock ROM. In it, various partitions are listed, and this one is called "environment for u-boot".
Going through the file. We first have, from 0x4 to 0x1D6, some text with the NUL char signifying end of line:
bootdelay=2
bootcmd=run setargs boot_normal
console=ttyS0,115200
nand_root=/dev/nandc
mmc_root=/dev/mmcblk0p4
init=/init
loglevel=8
setargs=setenv bootargs console=${console} root=${nand_root} init=${init} loglevel=${loglevel}
boot_normal=nand read 40007800 boot;boota 40007800
boot_recovery=nand read 40007800 recovery;boota 40007800
boot_fastboot=fastboot
recovery_key_value_max=0x13
recovery_key_value_min=0x10
fastboot_key_value_max=0x8
fastboot_key_value_min=0x2
All 00 until 0x1F4D5 to 0x2016C. Some gibberish first, but then we have the text (from 0x2004 to 0x2016C):
bootdelay=3
bootcmd=run setargs boot_normal
console=ttyS0,115200
nand_root=/dev/nandd
mmc_root=/dev/mmcblk0p7
init=/init
loglevel=8
setargs=setenv bootargs console=${console} root=${mmc_root} init=${init} loglevel=${loglevel}
boot_normal=mmc read 40007800 22000 10000;boota 40007800
boot_recovery=mmc read 40007800 recovery;boota 40007800
boot_fastboot=fastboot
All 00 until gibberish between 0x3F4D7 to 0x3FFFF, then FF for remainder of file.
Whatever this is, it looks important, so it's probably a good idea to also back up this partition.
/dev/block/nandc - boot
This contains the kernel and ramdisk. It again cannot be mounted as-is, so it again has to be split up and unpacked using unmkbootimg and gunzip, as descriped elsewhere. After doing this, we get:
Click here for tree listing.
initlogo.rle is the image which is shown immediately after the small square bootloader image but before the animated Android text logo. It's possible to change this - see elsewhere.
Description of this partition (from here):
This is the partition that enables the phone to boot, as the name suggests. It includes the kernel and the ramdisk. Without this partition, the device will simply not be able to boot. Wiping this partition from recovery should only be done if absolutely required and once done, the device must NOT be rebooted before installing a new one, which can be done by installing a ROM that includes a /boot partition.
/dev/block/nandd - system
This is where all the Android system files are located. Mount using
sudo mount -o loop -t ext4 nandd.img nandd
Note that the uid=1000,gid=1000 doesn't apply to an ext4 filesystem, so it will be mounted read-only. To add/remove any files from it, you'll either need to do it with sudo at the shell prompt, or (more dangerous) start a superuser session of your file manager - e.g. sudo nautilus.
Here's the contents:
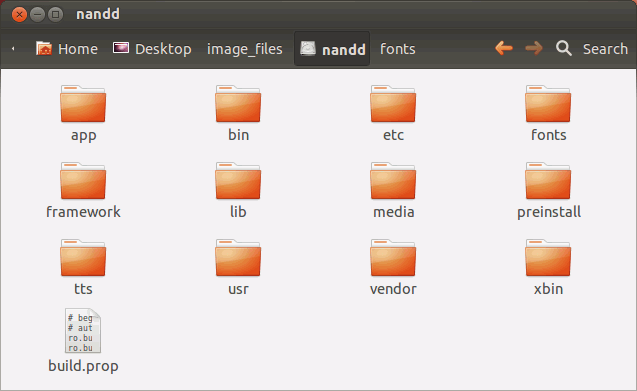
Click here for a tree listing. Notice the build.prop file - this contains details about the tablet.
Description of this partition (from here):
This partition basically contains the entire operating system, other than the kernel and the ramdisk. This includes the Android user interface as well as all the system applications that come pre-installed on the device. Wiping this partition will remove Android from the device without rendering it unbootable, and you will still be able to put the phone into recovery or bootloader mode to install a new ROM.
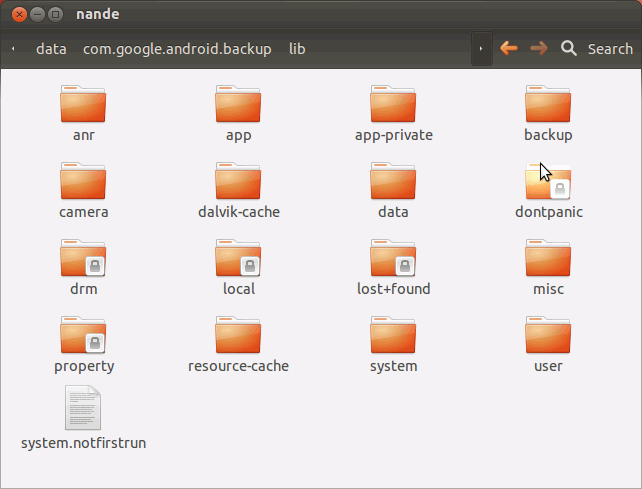
/dev/block/nande - data
Mount using:
sudo mount -o loop -t ext4 nande.img nande
Screenshot of the contents:
Click here for a tree listing.
Description of this partition (from here):
Also called userdata, the data partition contains the user’s data – this is where your contacts, messages, settings and apps that you have installed go. Wiping this partition essentially performs a factory reset on your device, restoring it to the way it was when you first booted it, or the way it was after the last official or custom ROM installation. When you perform a wipe data/factory reset from recovery, it is this partition that you are wiping.
/dev/block/nandf - misc
According to here:
This partition contains miscellaneous system settings in form of on/off switches. These settings may include CID (Carrier or Region ID), USB configuration and certain hardware settings etc. This is an important partition and if it is corrupt or missing, several of the device’s features will will not function normally.
And here:
Partition used to pass data amongst various stages of the boot chain (e.g. boot into recovery mode, fastboot etc)
However, it appears that this partition isn't used for this purpose on my tablets. The nandf image file seems to contain just a few large blocks of 0x00 or 0xFF. Here's a summary of the contents of the image file obtained from a variety of different situations. I also did a test to see what, if anything, is written to the partition. Text descriptions first, then an image.
1. From original good tablet (Mum's). 0x00 from offset 0x0 to 0x43F, then 0xFF from 0x440 to 0xFFFFFF.
2. Also from original good tablet, but can't remember how I obtained this. 0xFF from 0x0 to 0x1FF, 0x00 from 0x200 to 0x43F, then 0xFF from 0x440 to 0xFFFFFF.
3. Totally random. I created an image file with totally random bytes throughout and flashed this to nandf on the testing tablet.
4. Random image, after booting into Android. Booted the testing tablet into Android. nandf is identical to the random image - no change.
5. Random image, after rebooting into CWM recovery. Next booted into CWM recovery. Some change - 0xFF from 0x00 to 0x1FF, remainder random as before.
6. Random image, after rebooting into Android again. No change from before.
To make all this eaiser to visualise, here's a graphical representation of each image file. Each image shows the first 3200 bytes, arranged in 16x200 pixels, with the grayscale value corresponding to the byte.
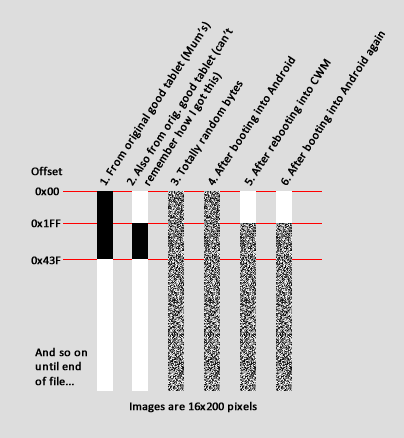
It would appear that this partition is somehow written to by the tablet, so I would guess there is no need to back up this partition, so long as it exists.
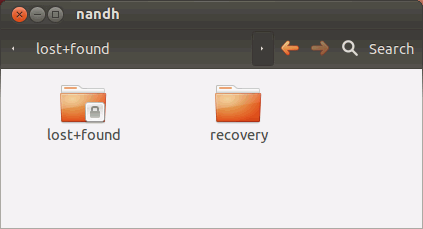
/dev/block/nandg - recovery
This contains the recovery partition. It cannot be mounted as-is, since it contains both a kernel and ramdisk. It has to be split up using the technique described on my other page "Unpacking and repacking CWM recovery image". After using unmkbootimg and gunzip, we end up with the following ramdisk contents:
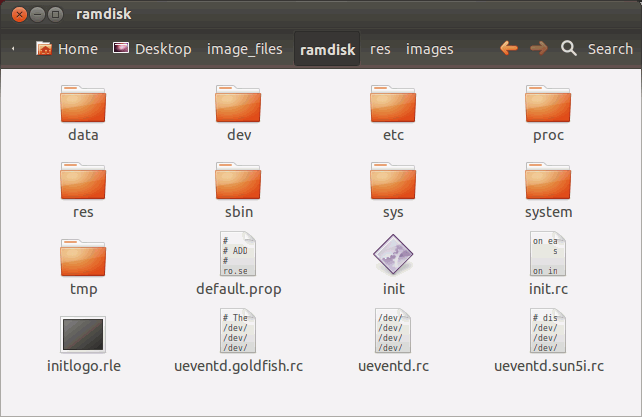
Click here for the tree structure.
This is very similar to the CWM recovery ramdisk, with slight differences (e.g. fewer images in the res/images directory, and a different init binary). This is because the recovery is a stock recovery partition. The contents of this partition are also very similar to the boot (nandc) partition, since it also contains a kernel and ramdisk.
Description of this partition (from here):
The recovery partition can be considered as an alternative boot partition that lets you boot the device into a recovery console for performing advanced recovery and maintenance operations on it.
/dev/block/nandh - cache
Mount with
sudo mount -o loop -t ext4 nandh.img nandh
Contents:
Click here for a tree listing.
The only interesting file is recovery/last_log - click here to see it. It appears to be a log of everything which happened the last time the tablet was booted into recovery mode.
Description of this partition (from here):
This is the partition where Android stores frequently accessed data and app components. Wiping the cache doesn’t effect your personal data but simply gets rid of the existing data there, which gets automatically rebuilt as you continue using the device.
/dev/block/nandi - emmc (a.k.a. databk)
This partition is called emmc when booted into CWM recovery, and is called databk when you look at the dmesg log from the booted Android system. Mount using:
sudo mount -o loop -t ext4 nandi.img nandi
Here's a screenshot of the root directory:
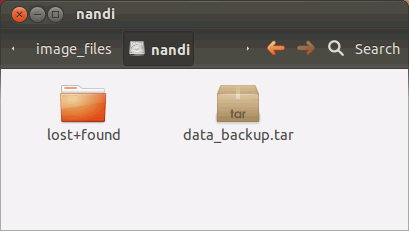
Click here for a tree listing.
Not much interesting there - what's data_backup.tar though? Let's copy it out and extract it - it produces a folder called data, which contains:
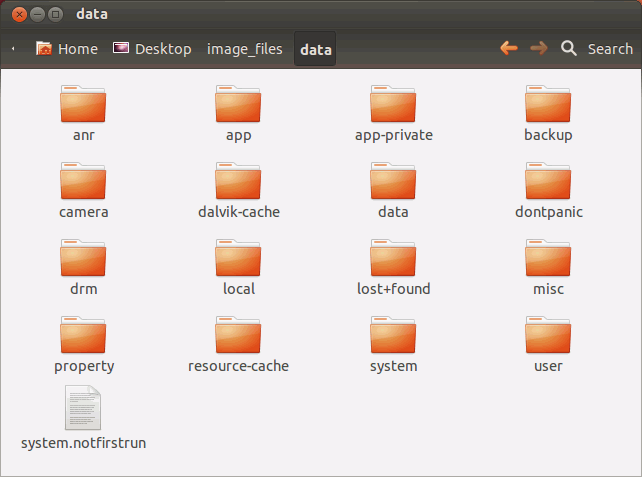
Click here for tree listing.
This would appear to be a complete backup copy of the data partition (hence the name databk in the dmesg output). When or how it was created, I'm not sure - perhaps the last time recovery mode was started. Since it is a backup copy, I would imagine that this partition (emmc) could be wiped without any problems.
Further confirmation that this is a backup of the data partition comes again from the COMMON_SYS_CONFIG000000.fex file, where it's called "data image backup". I don't quite see how it could be a complete backup, since the emmc partition is much smaller than the data partition.
/dev/block/nandj - sdcard
This is the "internal" SD card, used for storing user files, pictures, videos etc. Mount using
sudo mount -o loop,uid=1000,gid=1000 -t vfat nandj.img nandj
Here's a screenshot of the root directory:
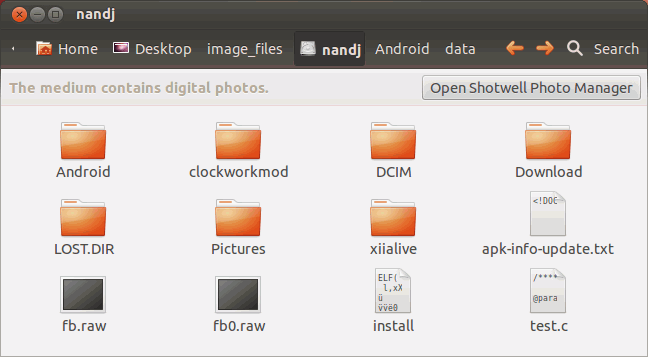
Click here for a tree listing of all files and directories.
Description of this partition (from here):
This is not a partition on the internal memory of the device but rather the SD card. In terms of usage, this is your storage space to use as you see fit, to store your media, documents, ROMs etc. on it. Wiping it is perfectly safe as long as you backup all the data you require from it, to your computer first. Though several user-installed apps save their data and settings on the SD card and wiping this partition will make you lose all that data. On devices with both an internal and an external SD card – devices like the Samsung Galaxy S and several tablets – the /sdcard partition is always used to refer to the internal SD card. For the external SD card – if present – an alternative partition is used, which differs from device to device. In case of Samsung Galaxy S series devices, it is /sdcard/sd while in many other devices, it is /sdcard2. Unlike /sdcard, no system or app data whatsoever is stored automatically on this external SD card and everything present on it has been added there by the user. You can safely wipe it after backing up any data from it that you need to save.